1 Overview
Configuration of document web part requires several steps to be completed in order to load the properly filtered subset of files from a SharePoint document library.
Note: by design the document web part should be in the host SharePoint web site where DynamicPoint Portal product is deployed.
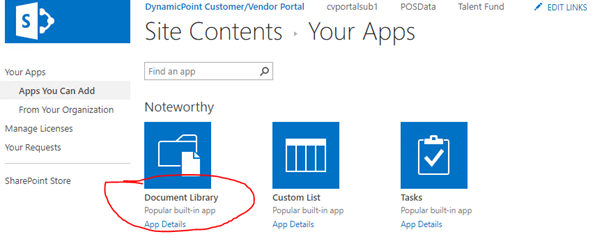
2 Prepare SharePoint Document Library
Note: all screenshots are taken from on-premises SharePoint 2016 environment, so UI details may vary if you work in SharePoint Online.
First the library must be created and additional metadata fields to be added to it.
Once created, add as many fields to the library as needed. At least one field should be added and populated with values for each document to allow proper filtering later in the Document Web Part.
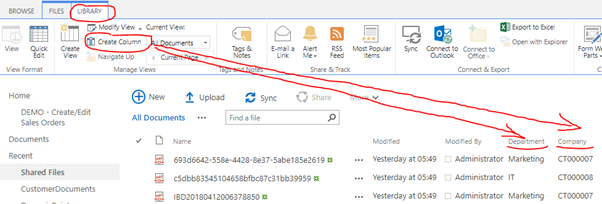
Upload some files and populate the metadata fields, especially the one on which the Document Web Part will be filtering.
3 Portal Configuration
Configure System Service
System services in Portal can be used to load data in dropdown fields or to obtain a filter value. When we want to obtain a filter value, it is important to make sure your system service returns only one result. Currently only one filter value is supported.
Here is an example system service, which we can use to filter our files in the web part:
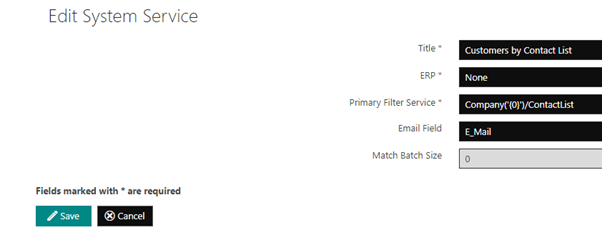
The system service operates only in the context of a parent service, so please note that only the specific part of the URL is provided in the configuration for Primary Filter Service. The Base service URL will be provided when we configure the Report parameter a bit down in the tutorial.
System services work over OData, so any OData service can be used to obtain filtering data. In the case of this example, we are using is a Business Central service, which exposes the Contacts List in BC.
Here is how the web service is defined:
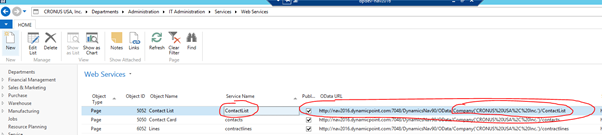
You can get to Web services using the search box at the top right. Type Web services and click Web Services in the results. This will take you to the above screenshot. The Contacts list (object ID 5052) is published as a web service and the OData url can be seen. Note how we use only the part starting from Company in our System service. The left part will be provided in another screen (Report parameter configuration).
The Contacts list looks like this:
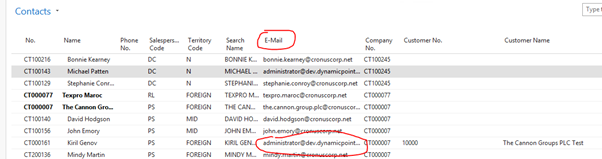
One important column here is the E-Mail column as we attempt to find a contact based on the email of the currently logged user in SharePoint. So, in System service we specify E_Mail (this is the internal name of the field, you need to load the metadata for the service in a browser to see the actual internal names of the fields you need from that OData service).
Basically, what the system service does is to make a call to the OData service configured and filter the results by the specified column in E-Mail field using the email form the currently logged in user. These will be the values which the system service will return. In our case we need to make sure there is only one Contact with the email of the current user, so it returns only one record from which to obtain the actual filter value.
In browser it will look like this:
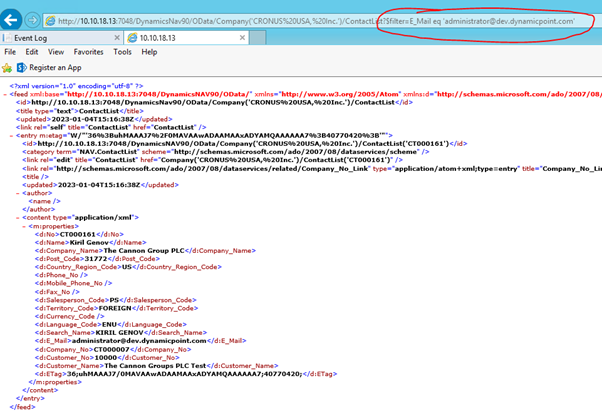
You can see how the returned result is only one, there are several fields in the result which we can use as a filter value. For instance, we can use the value of the Company_No field. We will see how to do that a bit down.
Note: see how the e-mail field in the response is actually called E_Mail(internal name) instead of E-Mail(UI string).
Configure Report Service
After we have configured our System service it is time to configure the report service, which will provide the actual grid data.
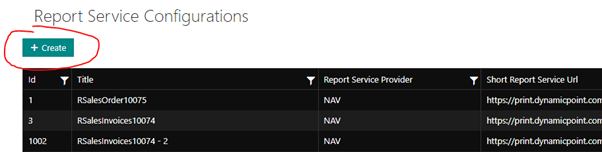
Go to Portal product, navigate to RS Configuration, and click Create:
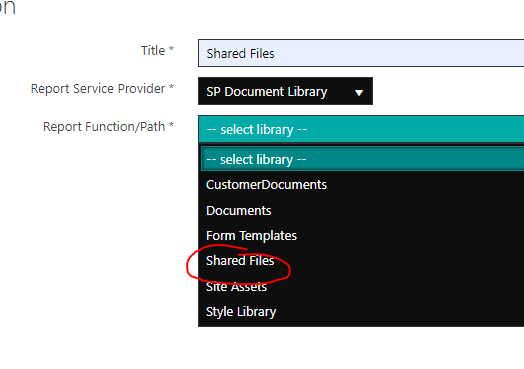
Provide a name for the report service and pick SP Document Library as Report Service Provider:

Once SP Document Library provider is selected the Report/Function Path field will be populated with all available document library from the host SharePoint Site. Pick the one you just created.
Click Create button at the bottom to save the report service configuration.
Configure Report Service Parameter
Next step is to create a parameter to filter the files in the Document Web Part.
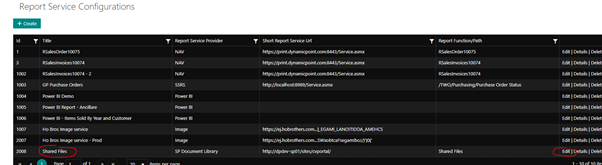
From Report Service Configurations grid click edit on the configuration you just created:
Click New Report Parameter to create the parameter. Note that we should create only one parameter, multiple parameters are not yet supported.
The Report parameter should look like this:
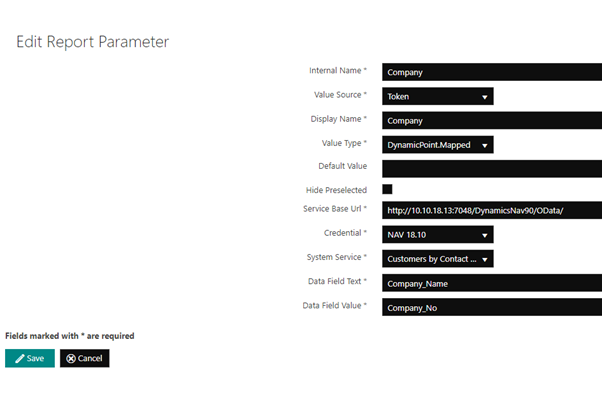
- Internal name of the parameter is the name of the field in the document library on which we are going to filter.
- Value Source should be set to Token, which will enable additional fields
- Value Type should be set to DynamicPoint.Mapped which will allow us to select a system service from which to obtain the actual filter value.
- Here you must specify the Service Base URL, which was mentioned in the Configure System Service section.
- Credentials should be valid credentials to access the ERP and the system service.
- System service should be set to the service which we discussed in the Configure System Service section.
- Data Field Value is important in our case as this is the field in the result which we will use to obtain the filter value. We configure Company_No, and if we go back to the browser screenshot with results from the system service, you can see the value will be CT000007.
- Data Field Text is the user-friendly value for the filter value, which in this case is not important what it is, just need to be a valid field name from the result of the system web service. The example value Company_Name used on the screenshot can be found in the browser screenshot with the results from the system service.
Configure Service
To configure the main service go to Services and click Create. The service should look like this:

- ERP should be set to None.
- Service Base Url, Company/Resource and Credentials are not relevant in this case, so populate with random values. In a subsequent implementation we can try to make these not required.
- It is important to set the Report Service Configuration to the Report Service you created.
- In List Fields and List Sort Fields put the fields from the document library which you would like to see in the Document Web Part. FileLeafRef is mandatory, so do not forget to add it. Also, you have to add the column which you have configured to filter on in the Report parameter configuration
Add The Web Part to a Page
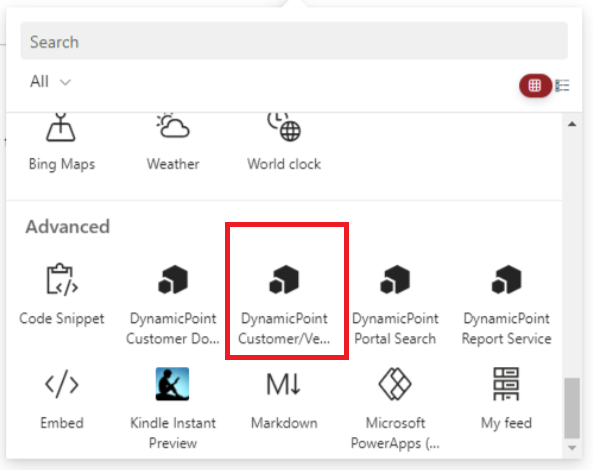
To add the part to a page, create a new site page in the host SharePoint site and add the DynamicPoint Customer/Vendor Portal part.
Web Part Results
When the Report parameter is being evaluated at runtime, a call is made to the system service using the Base Service URL from the report parameter and the relative service URL in the system service and if there is just one result the value of the Company_No field is obtained as filter value.
This filter value will then be provided to another call to SharePoint document library which will request all files filtered by this value.
For instance, the document library may look like this:
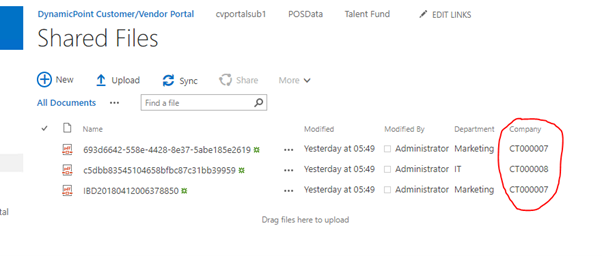
And based on our configuration the Document Web Part results will look like this:
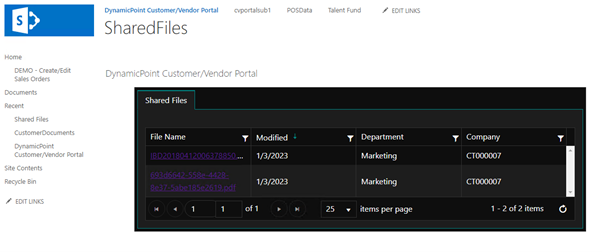
Please note that in the web part the current user sees only files which match the company from their contact profile in the ERP.